Social Links


This code only supports Android devices. I'll be create another schematics to support IOS devices.
Items Required:
1: ESP32
2: 2 Double Shaft BO Motors
3: L298 Motor Driver
4: Two 3.7V Batteries (You may use a different power source as well)
5: Battery Holder
6: RC Car Chassis (You can also create your own chasis or use a different one based on your requirement)
7: 1 Free-Rotating Wheel
8: Small Breadboard (optional)
9: Jumper Wires
You can also opt for an RC kit, here which includes the following components:
1: Chassis
2: Free-Rotating Wheel
3: One-way Switch
4: 3 1.5V Battery Holder
5: 2 Motors
Controller:
We'll be using Android App named Bluetooth RC car app, which you can find the link here . The code presented here is made to support this app only. You can also create your own app using MIT labs, but you'll have to update the signal unless you decide to use the same.
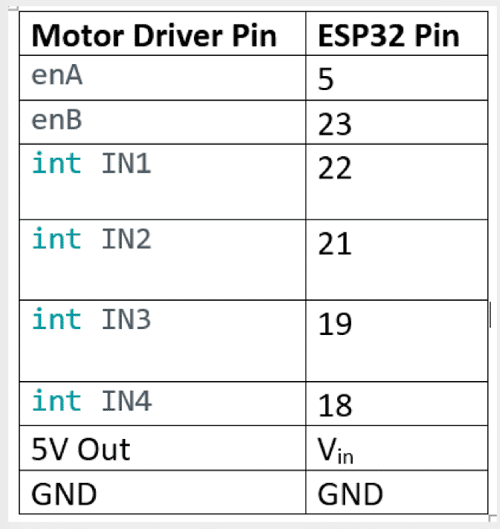
Pinout Diagram:
Code:
We'll be using Arduino IDE to create our code and upload it to ESP32. If you are new with using ESP32. Here is a guidelines on setting up ESP32 on Arduino IDE
Below is the code. Please ensure you've the bluetooth serial library installed. After that you can just copy the code and upload it to your ESP32
#include "BluetoothSerial.h"
#include <Arduino.h>
BluetoothSerial serialBT;
//Bluetooth signal Store in this variable
char btSignal;
//initial Speed
int Speed = 100;
//declare channel for pwm Output
#define R 0
#define L 1
//PWM Pin for Controlling the speed
int enA = 5;
int enB = 23;
//motor controlling pin
int IN1 = 22;
int IN2 = 21;
int IN3 = 19;
int IN4 = 18;
void setup() {
Serial.begin(115200);
//Bluetooth Name
serialBT.begin("BLT"); //Bluetooth name
//output pin declare
pinMode(enA, OUTPUT);
pinMode(enB, OUTPUT);
// Setup PWM channels
ledcSetup(R, 5000, 8); // Channel 0 for Motor A, 5 kHz frequency, 8-bit resolution
ledcAttachPin(enA, R);
ledcSetup(L, 5000, 8); // Channel 0 for Motor A, 5 kHz frequency, 8-bit resolution
ledcAttachPin(enB, L);
pinMode(IN1, OUTPUT);
pinMode(IN2, OUTPUT);
pinMode(IN3, OUTPUT);
pinMode(IN4, OUTPUT);
//Intial State of Car
digitalWrite(IN1, LOW);
digitalWrite(IN2, LOW);
digitalWrite(IN3, LOW);
digitalWrite(IN4, LOW);
}
void loop() {
while (serialBT.available()) {
btSignal = serialBT.read();
//Serial.println(btSignal);
if (btSignal == '0') Speed = 100;
if (btSignal == '1') Speed = 110;
if (btSignal == '2') Speed = 120;
if (btSignal == '3') Speed = 130;
if (btSignal == '4') Speed = 140;
if (btSignal == '5') Speed = 150;
if (btSignal == '6') Speed = 180;
if (btSignal == '7') Speed = 200;
if (btSignal == '8') Speed = 220;
if (btSignal == '9') Speed = 240;
if (btSignal == 'q') Speed = 255;
//to see the incoming signal in serial monitor
Serial.println(btSignal);
//backward
if (btSignal == 'B') {
backward();
}
//forward
else if (btSignal == 'F') {
forward();
}
//LEFT
else if (btSignal == 'L') {
left();
}
//RIGHT
else if (btSignal == 'R') {
right();
}
//STOP
else if (btSignal == 'S') {
stop();
}
}
}
//function for control motor
void backward() {
ledcWrite(R, Speed);
ledcWrite(L, Speed);
digitalWrite(IN1, LOW);
digitalWrite(IN2, HIGH);
digitalWrite(IN3, HIGH);
digitalWrite(IN4, LOW);
}
void forward() {
ledcWrite(R, Speed);
ledcWrite(L, Speed);
digitalWrite(IN1, HIGH);
digitalWrite(IN2, LOW);
digitalWrite(IN3, LOW);
digitalWrite(IN4, HIGH);
}
void left() {
ledcWrite(R, Speed);
ledcWrite(L, Speed);
digitalWrite(IN1, HIGH);
digitalWrite(IN2, LOW);
digitalWrite(IN3, HIGH);
digitalWrite(IN4, LOW);
}
void right() {
ledcWrite(R, Speed);
ledcWrite(L, Speed);
digitalWrite(IN1, LOW);
digitalWrite(IN2, HIGH);
digitalWrite(IN3, LOW);
digitalWrite(IN4, HIGH);
}
void stop() {
ledcWrite(R, Speed);
ledcWrite(L, Speed);
digitalWrite(IN1, LOW);
digitalWrite(IN2, LOW);
digitalWrite(IN3, LOW);
digitalWrite(IN4, LOW);
}